SUGCON 2017 – My Highlights

I had the most fortunate opportunity to fly over from the US to Amsterdam to attend SUGCON 2017 (Thank you Verndale!). Wow, do the Dutch and Danes put on a great conference!  Although I’m still curious about whole walnuts and the shot of juice? served in the late afternoon on the last day, I learned a boatload about Sitecore and upcoming hot topics.  Here’s a summary of some of the sessions that I attended:

Keynote

Lars Nielson and Pieter Brinkman opened the conference with some inspiring words and asking us all to push the boundaries of Sitecore.

OData Content API

There was talk on Sitecore Services Client and its OData Content API; consolidate and reduce the number of technologies (and security risks) to handle HTTP calls.

SXA overview and HoloLens and Robbie and Alexa

hololens

We were given a demo on how quickly SXA can be used to spin up a website; in this case, a website that visually shows all user groups throughout the world, on a map.  But that’s not all … how about throwing in some HoloLens integration and Sitecore Cloud and the map becomes a globe and the globe can be spun, user groups can be chosen and opened for more detail.  Next, let’s add a connection (via a JSON Sitecore device) to a robot named Robbie and integrate it with Amazon’s Alexa … “Alexa, Ask Sitecore to find all user group events.”

What else?  Well, Robbie can see things; Robbie can see your face … Robbie has learned how to read emotions via facial recognition.  The future says to set up Sitecore personalization based on the user’s emotion.  Cool.

This spawned possible answers to questions like:

  • What factors are driving desirable behavior most strongly?
  • How can we prevent the loss of existing customers?
  • What audience behavioral segments are we unaware of? We could target them, or banish them.
  • Can we optimize the sequence of tactics in our lead nurturing program?
  • Can we automate up-selling and cross-selling?
  • Can we make our content authoring processes more efficient?

Sitecore Integration with Microsoft Cognitive Services

mcs

This is the session I was most excited about.  Back in March, for the Sitecore Hackathon, our group used Data Exchange Framework to tap into Microsoft Cognitive Services and pull in tags for images.  It wasn’t until after we were done that I learned that Mark Stiles had already been hard at work creating a layer to easily integrate Sitecore and these services … and he presented its possibilities at the conference.

Within his “Sitecore Cognitive Services,” there are three bits of functionality: the Bot Framework, Sitecore Cognitive Services Service, and the Sitecore Cognitive Services module.

The Bot Framework is machine learning at its best.  Program a chatbot to gradually learn how to properly respond to your customers questions.

The Service is a fast way to integrate your website with the plethora of features Microsoft Cognitive Services offers, like Computer Vision, Emotion Recognition, Facial Analysis,  Video Analysis, even Speech Analysis.  There’s so much to tap into.

The Module is taking this a step further and integrating all of this into the Sitecore Admin.  Faceted image searches, textual analysis of text within images, facial analysis of people within Sitecore images.  Yes, machine-generate the alt text for your images, recognize if an image is too, ahem, adult, what colors are used in the image?

The possibilities seem endless.  By the way, Mark hasn’t tapped into all of the possible Microsoft Cognitive Services functionality; if you’re interested in helping out, contact him.

xDB Contacts and Concurrency Control

Ohhhh … lots of yummy take-aways from this session as well.

For instance, did you know that there are four sets of APIs for accessing the xDB contact data? … which is in a number of locations/states, I may add …

  • Tracker.Current.Contact (in-memory)
  • ContactRepository (access the data in the Collection database)
  • SharedSessionStateManager (access the data in the Shared Session database)
  • ContactManager (utilize both the ContactRepository and SharedSessionStateManager)

Dmytro Shevchenko also discussed the need for a shared session (i.e. for being able to maintain a single contact from interactions coming from multiple private sessions).

A great illustration offered was the summary of Contact Lock stages.

contact lock states

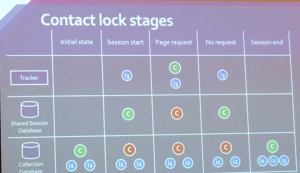
In the initial state, the latest Contact data exists in the Collection database.

When the Session starts, the Contact is locked in the Collection database and copied and loaded  (and unlocked) in the Shared Session database.

On Page Request, the Contact is still locked in the Collection database, and also locked in the Shared Session database but loaded into the Tracker API at this time.

When the Page Request ends, the Contact is removed from the Tracker, it is saved and unlocked in the Shared Session database, and still locked (and not updated) in the Collection database.

At the end of the session, the Contact is no longer available in the Shared Session (of course) and is saved and unlocked in the Collection database.

Well, that’s my summary of highlights from Day 1.  I’ll be posting Day 2 highlights after my extended trip to Paris.

Sitecore, SolrCloud and ZooKeeper Server Relationship

solrcloudzk

Recently there have been conversations online regarding the proper configuration of a SolrCloud/ZooKeeper with Sitecore setup.  This post will walk through the diagram above which illustrates a possible configuration of the ensemble.

ZooKeeper

The purpose of ZooKeeper is to maintain, in memory, the current state of each Solr server, the index configuration information stored in ‘z-nodes’, and also ensure that there is always a ZooKeeper leader via a leader election process.  Using in-memory to store this information allows for low latency and high throughput when accessing.

In the diagram above, there are 3 ZooKeepers to maintain server requests.  A primary principle of ZooKeeper is to maintain a majority, or quorum.  That is the recommended minimum as 3 zk servers tolerates 1 zk server being down; 5 zk servers tolerates 2 zk servers being down at the same time.  An odd number of servers (greater than 1) is recommended.

All ZooKeeper servers are known each Solr node and stored in the solr.xml file in the zkhost node, comma-separated. Example of 3 zk nodes:

<str name="zkHost">55.55.55.1:2181,55.55.55.2:2181,55.55.55.3:2181</str>

A good detailed reference on ZooKeeper (not in conjunction with Solr/Sitecore) is: https://www.hakkalabs.co/articles/apache-zookeeper-introduction.

SolrCloud

The number of SolrCloud servers (aka nodes) in the example of above (2) is demonstrating two replica servers.  In SolrCloud, there is no master or slave(s). Instead, a server is a replica and/or shard, which means the data on the server is duplicated on another node (replica) and/or the entire index is divided amongst the servers and a server contains a portion, or shard, of the data.  Typically sharding is reserved for indexes that are too large to fit on a single server, however, sharding without necessarily maxing out the capacity of the servers may be a performance strategy as well.

Load balancer

Contrary to some information out there, a load balance between SolrCloud/Zookeeper and Sitecore would not ‘load balance’ the ZooKeeper nodes.  The load balancer address would be in Sitecore’s configuration file, however, the load balancer is balancing the index and query requests into the Solr nodes.

In comments below, please feel free to put in additional relevant high-level information and I can add it to this post.

Experience Editor Exposé – Rapid Item Entry

Content entry of multiple items in Experience Editor

experience-editor
Exposing Experience Editor

The Experience Editor is a Sitecore integrated tool that exposes fields on the current page for editing, WYSIWYG style.  In MVC views, if you take advantage of the HTML helpers provided by Sitecore to render fields or use Glass Mapper’s Editable helper, the fields from the current context item are magically editable in this Editor.

This blog series intends to reveal some common scenarios that are not natively built in and require a combination of configuration and perhaps some coding.

A common scenario that I’ve seen is the content editor’s desire to rapidly add one item after another in Experience Editor.  There is an “Insert Page” option in the XE ribbon, however, this is to create a item as a child of the existing item.

insert-new-page
Inserts a new child item

To do repeatedly enter sibling items in XE without any configuration, the user does the following:

  • create a new item in the content editor
  • go to the Publish->Experience Editor ribbon command
  • add content to new item
  • save
  • close XE
  • …repeat …

(NOTE:  The user could also create a child item with the “Insert page” option, followed by the “Move page” option.  This is clunky as well).

Here is an alternative.  Create a ‘window’ to the parent item on the existing page and then expose the “New Item” functionality in the Field editor buttons.

In the example below, we have a parent folder called “Articles” with either one- or two-column articles as children.  We’ve added an “Button Name” field to the folder to support a button name.

parent-child-article
Articles folder has Insert Options of “Article One Column” and “Article Two Column”

Let’s add an Edit Frame and expose the ability to insert a child article under the Articles folder while viewing a child article in Experience Editor.

In the main article’s MVC view and CORE database, do the following:

  1. Add a reference to the Sitecore.Context.Item.Parent (be sure to add in any null checks, etc)
    var ParentModel = SitecoreContext.Cast<Article_Folder>(Model.Item.Parent);
  2. Add a new Edit Frame Button folder and Insert WebEdit Button in the Core database at:  /sitecore/content/Applications/WebEdit/Edit Frame Buttons
    edit frame example.png
  3. Add an EditFrame inside the View.  This references the path of the Edit Frame Folder in the Core database. The Button_Name also becomes editable if needed.
var path="/sitecore/content/Applications/WebEdit/Edit Frame Buttons/AddArticlePage"
using (BeginEditFrame(path))
 {
 <button>@Editable(ParentModel, x=>x.Button_Name)</button> 
 }

Result:

insert-item

After saving the current article, use this new button’s “insert item” functionality to add a sibling article.


Sitecore: Using PowerShell Extensions to create new items in Sitecore from a CSV

So you wanna import data into Sitecore and the source you have is an Excel spreadsheet?

You can convert it to CSV and import with PowerShell Extensions.  The script below imports a series of items from a CSV. Based on the template, it decides the Sitecore content path (blog or article).  It assumes that the CSV has columns with the following headers:

  • ItemName  – does not support invalid characters (see your Sitecore.config)
  • PageTitle – mapped to a Page Title field on the template
  • Templates – a Sitecore path to each row’s template
  • CreatedBy

Basic PowerShell Script

$global:BlogPath = "/sitecore/content/SampleSite/Home/Blogs"
$global:ArticlePath = "/sitecore/content/SampleSite/Home/Articles"

$InputcsvFile = Show-Input "Input file path"
$csv = Import-CSV $InputcsvFile -delimiter "," 

$bulk = New-Object "Sitecore.Data.BulkUpdateContext"
try 
{

 foreach($record in $csv)
 {
   $path = $global:BlogPath
 
   if ($record.Templates -like '*Article*') {
    $path = $global:ArticlePath
   }
 
   $item = New-Item -Path $path -Name $record.ItemName -ItemType $record.Templates
 
   $item.Editing.BeginEdit()
     $item["__Display name"] = $record.ItemName
     $item["Page Title"] = $record.PageTitle
 
     #add other mappings ...
 
     $item["__Created by"] = $record.CreatedBy
 
   $item.Editing.EndEdit()
 
 Write-Host "Item created: " $record.ItemName
 
 }
 
}
finally
{
 $bulk.Dispose()
}

Data Massaging – using VB Macro

The data from the source system isn’t necessarily going to be ready to import. Because I was running the import multiple times, I wrote a data massaging VM Macro to do the following:

  • Convert the source Page Title to a valid Item Name (created a new column)
  • Convert tag words to guids. Since I had to import tags (words), I imported the guids for the tags to a separate worksheet and used VLOOKUP.
  • Add template path. The spreadsheet indicated whether each row was an article or blog; I created a column for the template path for each and used VLOOKUP from another worksheet

This macro below may be helpful.

'sheetName = worksheet where guids are located
'originalCol = column that contains a pipe-delimited list of tags as words
'newCol = destination for pipe-delimited guids
'importSheet = output worksheet (to CSV)
'maxRow = total number of rows in output worksheet

Sub ReplaceMetaTags(sheetName, originalCol, newCol, importSheet, maxRow)
 'get range of meta tag sheet
 Dim sht As Worksheet
 Set sht = Sheets(sheetName)
 
 Sheets(sheetName).Select
 
 Range("A1").Select
 Range(Selection, Selection.End(xlToRight)).Select
 Range(Selection, Selection.End(xlDown)).Select
 
 Dim lastTagRow As Long
 lastTagRow = Selection.Rows.Count
 
 'switch back to importSheet
 Sheets(importSheet).Select
 
 'create new column for guids
 Range(originalCol & "1", originalCol & maxRow).Select
 Application.CutCopyMode = False
 Selection.Copy
 Selection.Insert Shift:=xlToRight
 
 Range(newCol & "2", newCol & maxRow).Select
 Dim fRange As Range
 
 Set fRange = Selection
 
 
 Dim fcellValue As String
 Dim newCellValue As String
 
 For Each rngCell In fRange
 
 fcellValue = rngCell.Text
 
 If fcellValue = "" Then
 
 rngCell.Value = ""
 
 ElseIf InStr(1, fcellValue, "|") Then
 
 Dim arr As Variant
 arr = Split(fcellValue, "|")
 
 newCellValue = ""
 
 For i = 0 To UBound(arr)
 
 topicVal = Application.VLookup(arr(i), sht.Range("A2:B" & lastTagRow), 2, False)
 
 If Len(newCellValue) > 0 Then
 newCellValue = newCellValue + "|" + topicVal
 Else
 newCellValue = topicVal
 End If
 
 Next i
 
 rngCell.Value = newCellValue
 
 Else 'single value
 
 rngCell.Value = Application.VLookup(fcellValue, sht.Range("A2:B" & lastTagRow), 2, False)
 
 End If
 
 Next rngCell

End Sub

Lessons Learned: xDB Cloud Edition setup helpful hints

While installing xDB Cloud Edition for a client, it’s important to know about the two distinct versions … 1.0 and 2.0.  (Deployments of new sets in xDB Cloud 1.0 are not available).

Ensure that you know the correct edition.  If you make the mistake that I did (installing 1.0 dlls and configs when the client purchased 2.0), you’ll encounter some errors.

First of all, the configuration files in the /Include/xDB Cloud folder are named the same (for 1.0 and 2.0) but there are major differences in them.

For instance, with 1.0, you receive configuration information from Sitecore support and enter it in the configuration information into the Sitecore.Cloud.Xdb.config.

Could not find configuration node: contentSearch/retryPolicy
Exception: System.InvalidOperationException
Message: Could not find configuration node: contentSearch/retryPolicy
For xDB 2.0, the NonProd deployment type is not supported. For more information, see the article:


(Quick Tip) Data Attributes using HTML Helper methods

Don’t forget this MVC necessity for adding data attributes to your HTML helper methods.

With javascript frameworks utilizing data attributes within the HTML tags, keep in mind this rule for MVC razor. Data attributes will have a syntax like “data-*”. If you add the hyphen within the name of an attribute, Razor interprets this as a minus sign. To add a data attribute within an HTML helper, replace the hyphen with an underscore. Razor recognizes this and converts it to a hyphen.

@Html.TextBox(“FirstName”, null, new { data_new_attribute = “foo” })

The HTML helper above yields this html:

<input id=”FirstName” name=”FirstName” type=”text” value=”” data-new-attribute=”foo” />

🙂

Quick tip (list): Sitecore and Digital Asset Management options

Shopping around for a DAM with a Sitecore connector? Here are a few options:

https://picturepark.com/dam-connectors/sitecore
http://www.widen.com/sitecore-integration
https://www.adamsoftware.net/what-we-do/extensions/sitecore-connector/
http://digizuite.com/software/digizuite-sitecore-digital-asset-management-connector/

Here’s an article to help your client understand their particular needs for a DAM:

http://www.cmswire.com/cms/digital-asset-management/six-questions-to-answer-before-selecting-a-digital-asset-management-system-019790.php

Quick tip – Sitecore WFFM – Saving to the database

In Web Forms for Marketers (WFFM), version 8, there is no longer a “Save to Database” save action. It is implied; WFFM will save the form data to the MongoDB or you can change the forms data provider to point to a different database as well.

What if you don’t want to save the data at all or not save some of the fields?

A new field has been introduced to turn off this default action at either the form or field level. Uncheck the “Save Form Data To Storage” field at the field or form level, save, and publish. That’s it!

https://doc.sitecore.net/web_forms_for_marketers/setting_up_web_forms/appearance/specify_the_forms_and_fields_to_save_data_in_a_database

Why would you want this?

At the field level, you could hide unnecessary fields (like a honeypot captcha) from polluting the forms collection.

At the form level, you may only want to send an email or only want to save the data to an external system, like Salesforce.